Thursday, December 6, 2012

Continuous Bias Binding Tape Tutorial

Well of course I ran out of red bias binding two days before a Christmas Market for which I am trying to finish of some cute sweet little girl's Christmas dresses.

After wasting 3 hrs trying to find some ready made I decided it will be faster if I give it a go myself. But I wanted a SUPER QUICK - SUPER EASY method!

PHOTO: www.coletterie.com

After looking for a tutorial I found this amazing, simple, fast, fabulous, easy to follow tutorial at Coletterie. This tutorial is written by Rachel and has great photos to follow too!

So ... have a go!

Friday, August 31, 2012

Scalloped Bunting Tutorial

Picture from here
Today I was visiting the Sew, Mama, Sew! blog and I found a gorgeous tutorial on making scalloped fabric bunting by Jessie from the Blog Sweet Jessie.

Bunting is so fun and fabric bunting is great because it lasts for years and is easily washed and can be reversible and made from scraps leftover from other sewing projects.

To have a look at loads more photos or grab the free PDF template and instructions please go to the Sew,Mama,Sew! blog here

Thursday, August 30, 2012

Shabby Chic Cupcake Wrappers

Free Printables! One of my favourite sentences ever.


CLICK HERE TO GET THE DOWNLOAD


I adore the colours used in these cupcake wrappers and although they were originally intended for Easter celebrations, any time you have cupcakes is a good time.

Fill them with lollies, or maybe flower heads for a table centrepiece.

These were designed and created by the gorgeous ladies over at Shabby Blogs - The Blog

If you use them, let me know what you decided to do!


Wednesday, August 29, 2012

Repurposed Book Sewing Kit DIY Project

Today I found this amazing repurposed book project on Jessica Jone's Blog - How About Orange


This amazing project has been created by Lisa Occhipinti and is featured and shared from Jessica's blog.

To have a peak at more pics and get the PDF download with the instructions on how you can make it please visit Jessica's Blog Here

Let me know if you do one! I'd love to see pics

Tutorials ...

Today I'll be listing some of the tutorials I currently have on my blog into my sidebar ... please feel free to check them out and comment! Most of them are Christmas Crafts but I promise I will be adding more tutorials on sewing, basic embroidery, making, cooking and heaps more!


Friday, June 1, 2012

Photo A Day in June

This month using Instagram I'll be participating in Fatmumslim's instagram follow~along photo a day. Do you have instagram? Why not join in too! You can also use your blog, facebook, twitter or flikr to join in!

Here is the list but for a complete breakdown of ideas and how to's please visit Chantelle's blog - Fat Mum Slim for all the details!


Wednesday, March 28, 2012

Kitty Boo Boo Handmade Wedding - The Accessories

We made so much for this wedding, many of them the tiny details like the necklaces, the bouquets, the clutches, the ring dish, the place cards, the table toppers, the wishing well, etc etc.

What we couldn't make we had made for us by our crafty friends or other handmade small businesses.


Our rings we bought from jewellers as we couldn't afford bespoke pieces. After looking for nearly 12 months for a second hand vintage band I finally found a replica, very affordable and just down the road at the local shops! Pete found his ring online.

I made the ring dish from air drying clay. You can't see the detail but I used a doily to 'etch' a pattern into it.  I will add a tutorial if there is any interest!


All the girls wore a necklace. Our accessory colour was silver so we all had silver swallows with a string of 5 pearls (to represent Love, Patience, Grace, Kindness, Respect). each one was handmade by me.


Peter bought me a bracelet made by a local artisan from The Swich Contemporary Art Space in Ipswich. It is made from some vintage spoons and a pearl. Absolutely gorgeous. I'm fairly sure the spoons themselves are over a hundred years old.

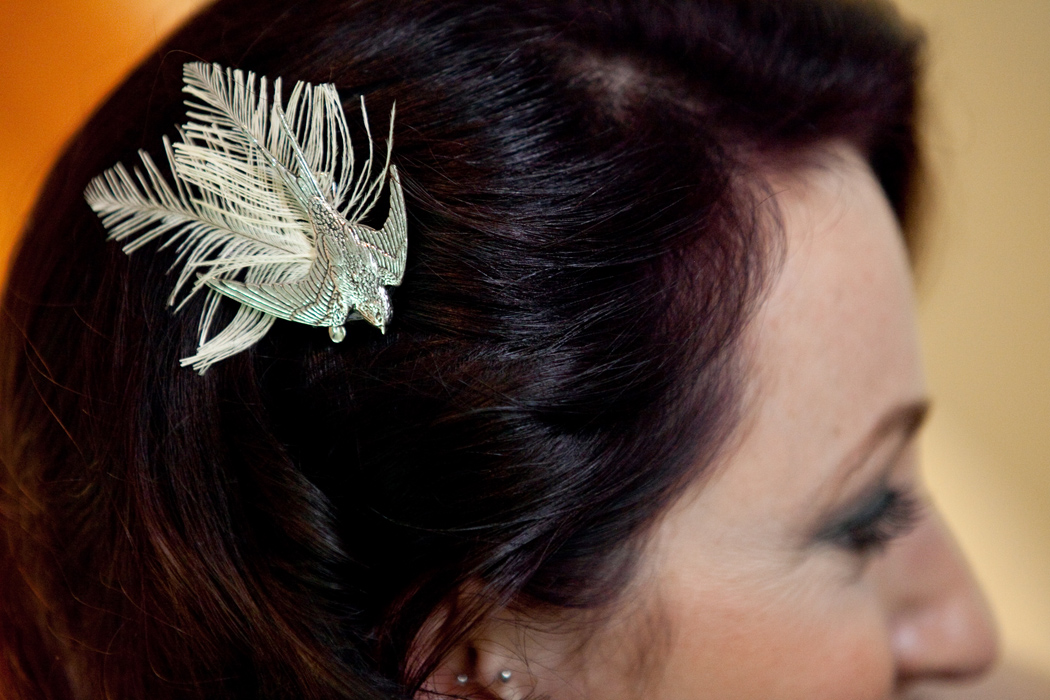
We sourced the swallows used as boutonnières from the UK. They are Victorian replicas made from pewter signed by the maker AR Brown. I also made these into mini fascinators in all the girls hair. Every member of the bridal party had a swallow as did each one of our parents. Very easy for people not familiar with our parents to locate them on sight!


I embroidered the swallows for the clutches onto silver satin and my friend Belinda from Sybella turned them into beautiful clutches!


Kim and I bought flowers two days before the wedding. We bought them from Northside Flower Market We picked bunches of seasonal that matched our colour scheme and I made the bouquets on Friday night. I had originally wanted to use snap dragons but they are so fragile there is no way they would have lasted and made the trip to Tamborine. We used dusky pink roses, wax flowers, silver suede, and I can't remember the name of the yellow number! I made 5 bouquets and the flowers cost less than $80. Win. We tied the bunches together and wrapped wide lace around the stems. Then I used a ribbon in the colour of the bridesmaid around the centre of the lace so each lady could find her bouquet.


We had a minor crisis with the centrepieces. The ones we selected from the venue became unavailable so Pete and I decided to make our own as the others seemed too tropical. I used my collection of doilies and stitched them together to create the table toppers. We hired some lanterns, I bought some faux aloe vine from a small local business and we cut, moulded and assembled the flowers for the tables.


I used some decorative scrapbooking tags and some sheets of sticky back gems and made the table numbers. We used tiny little silver birds to hold the cards.

We decided to give everybody plants as bonbonierres. We served desert with the meal and we had cupcakes for our guests (we kept the cake to ourselves YUMMO) so we used Rosemary and Lavender (virtue, love, loyalty, fidelity) and I was quite surprised how well people too to them!


I painted a tree on a canvas and we used leaf shaped stamps for our guests to use as a guest book.

We also had printed some postcards which we asked our guests to use to give us their well wishes or advice.


We dressed up some bird cages for our wishing well.


Tuesday, March 27, 2012

Kitty Boo Boo Handmade Wedding - The Boys!

Well the boys were super handsome! Dressed in hire suits from Spurling they rocked it! We bought my son Sam's suit for a wedding we went to a few years ago, lucky we bought that bigger size!


All the boys wore swallow pins instead of boutonnières. The swallows were a link in the chain of our mish-mash theme. I sourced these from a jewellery maker in the UK.  I'll post about all the swallows later!


The boys were great on the day, they kept our glasses full, held clutches and sunglasses, parasols and wraps, watched the kids and held dresses. 


Pete's brother Mark was one of the grooms men, the other two have been friends for many years. Steve was at school with us both and Brad has been a friend for going on 11 years.


Kitty Boo Boo Handmade Wedding - The Dresses

Some of you know that I made the bridesmaids dresses, my daughters dress and my mum's dress for our wedding. I decided not to make my own dress as I just didn't have the time, let alone the desire to deal with all the heartbreak if it didn't work out!

It was a tight stretch as I waited until a few weeks out to measure the girls and then Therese was away for nearly a week in FiJi at another wedding, Ange was in Scotland for a trip and Kim lives in the UK. None of the dresses were finished more than 6 days out from the wedding and I didn't finish Kim's dress until the day before the wedding! Talk about pressure! Not to mention the fact that we had a chiffon emergency ... I was hand washing out the chalk marks when the chiffon pulled out from the seam and frayed! Some added lace and ribbon did the trick but it was horrifying there for a while.

Our colour scheme was vintage pastels so I chose a soft gold, dusky rose, silver blue and mint green.

My bridesmaids have been close friends for so much of my life. Therese in Pink - 20 years, Ange in mint - 17 years, Kim in blue - 14 years. I also had the pleasure of living with both Kim and Ange. Such awesome girls!

I drafted the patterns myself and made each dress a different style.

My dress was a Wendy Makin, I fell in love with it when I saw it, though after a few dramas in regards to sizing and alteration I must admit I was a little over it but  it is quite pretty and I wanted something simple and flattering.

Without further ado ...


Wednesday, February 22, 2012

Sk8er Petition - Grovely Skate Bowl

In my area a new small business has pretty recently opened - SK8ER - a pretty cool shop for skaters and alternative people. Chock full of clothing, boards, skate equipment and much more!

They are currently running a petition to have a mostly unused park transformed into a skate park.

Please help by signing the petition or reposting this on your social media sites!


Background (Preamble):
We are wanting to try and upgrade the area next to the Grovely Train station into an area where families can go and enjoy the park with a skate bowl, sitting area, bike track and swings.

Let's make a dull area into a park that the whole family can enjoy.
Petition:
Skate Park and Recreational AREA GROVELY Petition | GoPetition

Friday, February 3, 2012

Kitty Boo Boo Handmade Wedding - The Venue

As I stated earlier, we chose Cedar Creek Lodges at Thuderbird Park, Mt Tamborine for our wedding. We had been to a wedding there and loved the venue. Pete and his family use to camp there when he was younger. 


There are quite a few areas in the park to have your ceremony and/or reception at but we chose the Rainforest Amphitheatre for our ceremony and the Island Glade for our reception. These are outdoors but covered and were truly beautiful! All that luscious greenery and cedar creek running behind us ... serene and beautiful!

The Island Glade has a roof but is right next to the amphitheatre (which became the dance floor later). There was an open fire and low lighting after the speeches. These areas are separated by the ssupport beams which were entwined with Jasmine. It smelt divine too.


The bridal party walk down from the gorgeous cabins through the rainforest over the cutest little bridge and follow the winding path to the wishing well and amphitheatre. As the guests are sitting (on cushions) on the stairs they get to see the bride enter from the side.


It was very romantic and had a great ambience!


The food was all cooked at the Island Glade (there is a kitchen down there too!) and a bar at the back of the area. The food was absolutely DIVINE and just about all of our guests mentioned it to us! It was an important factor, I really wanted a great meal. Nothing worse than a crap 3 course meal to sit through! It was piping hot and cooked beautifully! The dessert was amazing. We were so impressed by the quality.


We look forward to going back on our anniversary and even if we choose the very affordable camping option there's so much other cool stuff to do at Thunderbird Park we are all looking forward to it!


These photos are from the first trip down to check out the venue and sign the paperwork!


Walking to the Amphitheatre (for guests)

The view from the stairs looking into the Island Glade

From the Amphitheatre looking at the path the bride walks

View from the Amphitheatre looking at where guests will sit

That sweet bridge

from the path looking into the Amphitheatre and Island Glade

The Island Glade (minus all the tables of course) and Sam!

The bar is at the back!


Tuesday, January 31, 2012

Kitty Boo Boo Handmade Wedding - Save The Date

Hi again, welcome to the 4th post in this series about our handmade wedding. (Read 1, 2 & 3)


After setting the date Pete and I talked about where to have the wedding and how we'd let people know. We chose a gorgeous venue we had been to before, actually Pete and his family use to camp there!


We loved the tranquility and beauty of the natural surroundings at Thunderbird Park, Mt Tamborine and were eager to get married there. We knew that with so many friends and family interstate we'd need to let people know with plenty of notice so they could arrange travel and accommodation. We sent out our Save The Date's in January (9 mths ahead of the wedding) so people could get organised, unfortunately for us, the Brisbane floods of 2011 intervened and we needed to send out a second set to many people!


Both Pete and I love to draw and we had a 'dialogue' about who would illustrate it. We agreed to a theme and then decided that I would draw the Save the Date's and he would draw the invitations.


We wanted to incorporate a little bit of flash tattoo as we are both fans, also we wanted swallows as they have been quite symbolic to us (and our little nest). I still wanted to keep the vintage, nouveau style in there and we wanted to keep the colours from my shoes as well. It was sounding like a hodge podge of mess but after a few simple layouts I decided on a swallow style (the same swallow that Pete and I have tattooed on us actually) and then the swallow colours came from the shoes.


Anyway, here it is


Monday, January 30, 2012

Kitty Boo Boo Handmade Wedding - Colour Scheme

We have arrived at post #3. Hi again, and thanks for joining me!


This post is all about the colour scheme! Such an important part of any wedding, as it is usually what dictates everything from shoes to bridesmaids dresses, flowers and linen.


As I stated in my last post, my shoes are the foundation for the colour scheme. They are comprised of vintage hues of Silver Blue, Dusky Rose, Mint Green and Soft Yellow Gold.


I went and found some paint swatches that matched my shoes and began collecting fabric swatches as I intended to make the bridesmaids dresses and my daughters dress as well as the flowers.


These swatches made my life so easy. I carried them around and they were so good for a quick reference!


Here's the results