So, you have decided to make a garment!
You go to the store and spend ages looking through the pattern books until you find a pattern you like.
You carefully write down the number and brand and size you want, wait patiently for your turn at the counter, ask for your pattern and then
FREAK OUT
when you see all the writing and numbers and weird gobbledy-gook-secret-sewer-speak on the back.
I hope that over this tutorial I can help you
- Choose the correct size for you
- Read the back of a paper pattern envelope
- Learn how to adjust the pattern to fit you better
Today we will start with size.
TUTORIAL #1 :: How to Read a Paper Pattern - SIZE
Understanding sizing, measuring the body and choosing the correct size pattern.
Taking correct body measurement and comparing them to the pattern measurements is necessary in order to choose the right size and make a well fitting garment.
Firstly - lets look at how sizes are determined:
- Misses' and Women's tops, blouses, shirts, jackets and dresses by BUST measurement.
- Misses' and Women's skirts, pants and shorts by HIP measurement.
- Men's shirts, jackets and robes by CHEST measurement.
- Men's pants and shorts by WAIST measurement.
- Children's by HEIGHT and CHEST measurement.
- Toddler's by HEIGHT measurement.
- Babies by HEIGHT (LENGTH) and WEIGHT measurement.
Patterns are most commonly but not always designed for particular heights:
- Misses' and Women's sizing is for those approximately 5'6" - 168cm
- Men's sizing is for those approximately 5'10" - 178cm
- Children's and Toddlers sizing includes a height for each size
- Babies' sizing included height and weight for each size
HOW TO MEASURE THE BODY
Height: for adults and children, have the person stand against a wall without shoes; place a ruler straight across the head and mark the wall.
To measure a baby, lay the baby on a flat surface, measure and mark from the top of the head to the bottom of the foot.
Bust and Chest: Measure around the back, under the arms and over the fullest part. The tape measure should be straight across the back. Arms should be resting at the sides of the body while measuring.
Natural Waist: Tie a string around the waist to determine the natural waist. Measure around the waist, don't pull too tight, be sure the tape can move around. (Leave the string there until all measurements are taken)
Hip: Measure over the fullest part of the hip, usually 7"-9" (18cm - 23cm) below the waist. As each person's body shape is different, the fullest part of the hip may be higher or lower.
Shoulder and Arm Length: Loosely place the string around the neck (where the string rests is the natural neckline). Bend the arm slightly, measure the shoulder from the natural neckline (string position) to the shoulder joint and continue over the elbow, down to the wrist bone. Note the Shoulder Width separately, the Arm Length separately, and the Shoulder and Arm Length combined.
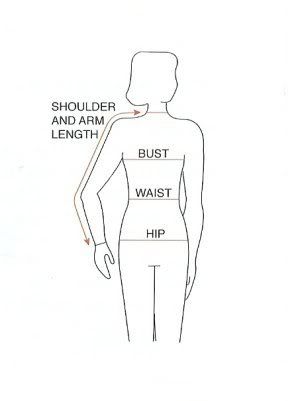
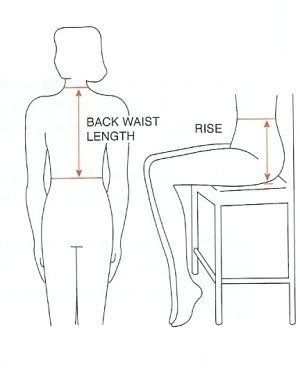
Back Waist Length: Measure from the top of the backbone (from the string position at the back of the neck), to the Natural Waist (where the string is tied around the waist).
Rise (Crotch Depth): Have the person sit up straight on a flat table or hard chair which does NOT have any curves in the seat. At the side measure from the waist (where the string is tied around the waist) over the curve of the hip to the top of the table or chair.
HOW TO MEASURE FOR FINISHED LENGTHS
When measuring the body, measure for desired length as follows:
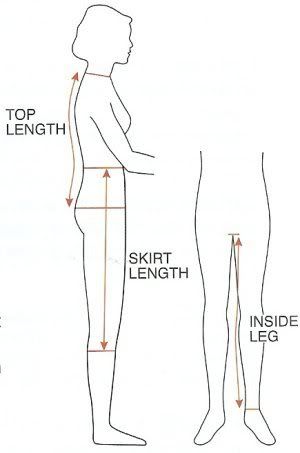
Tops: Measure from the top of the backbone to the desired length
Skirts: Measure from the waist to the desired length, Begin by placing the end of the tape at the position you wish the skirt to end, this will make it easier to read the measurement.
Pants: Measure the inside leg from the desired hemline to the crotch.
NEXT TIME: Determining if pattern adjustments are necessary ...