
Showing posts with label embroidery. Show all posts
Showing posts with label embroidery. Show all posts
Wednesday, August 29, 2012
Tutorials ...
Today I'll be listing some of the tutorials I currently have on my blog into my sidebar ... please feel free to check them out and comment! Most of them are Christmas Crafts but I promise I will be adding more tutorials on sewing, basic embroidery, making, cooking and heaps more!


Wednesday, March 28, 2012
Kitty Boo Boo Handmade Wedding - The Accessories
We made so much for this wedding, many of them the tiny details like the necklaces, the bouquets, the clutches, the ring dish, the place cards, the table toppers, the wishing well, etc etc.
What we couldn't make we had made for us by our crafty friends or other handmade small businesses.
Our rings we bought from jewellers as we couldn't afford bespoke pieces. After looking for nearly 12 months for a second hand vintage band I finally found a replica, very affordable and just down the road at the local shops! Pete found his ring online.
I made the ring dish from air drying clay. You can't see the detail but I used a doily to 'etch' a pattern into it. I will add a tutorial if there is any interest!


All the girls wore a necklace. Our accessory colour was silver so we all had silver swallows with a string of 5 pearls (to represent Love, Patience, Grace, Kindness, Respect). each one was handmade by me.


Peter bought me a bracelet made by a local artisan from The Swich Contemporary Art Space in Ipswich. It is made from some vintage spoons and a pearl. Absolutely gorgeous. I'm fairly sure the spoons themselves are over a hundred years old.
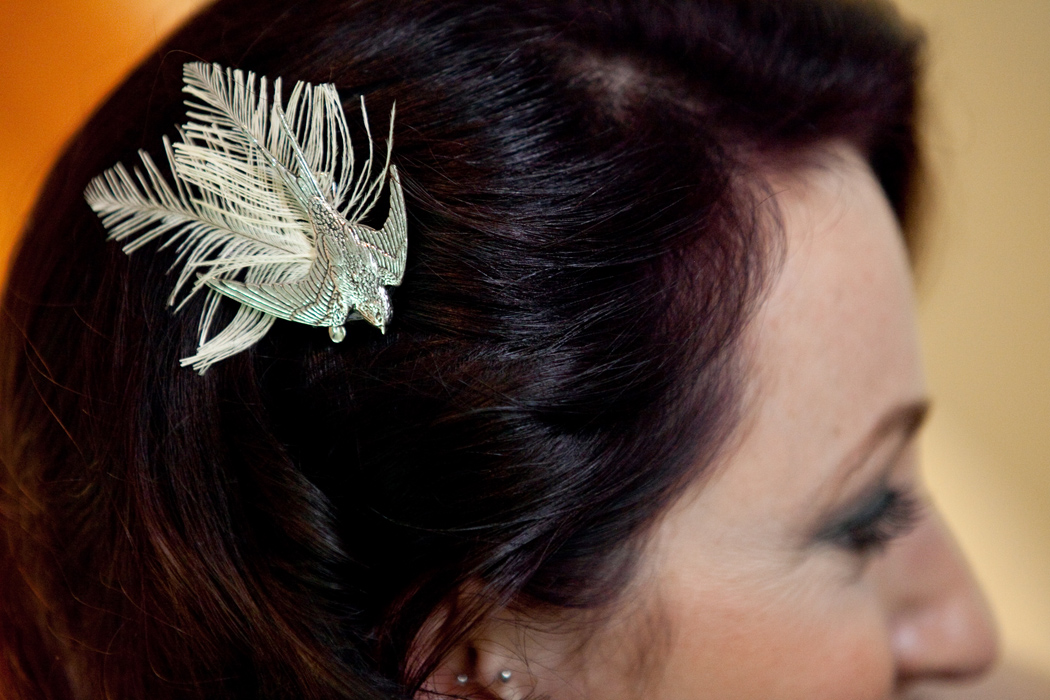
We sourced the swallows used as boutonnières from the UK. They are Victorian replicas made from pewter signed by the maker AR Brown. I also made these into mini fascinators in all the girls hair. Every member of the bridal party had a swallow as did each one of our parents. Very easy for people not familiar with our parents to locate them on sight!


I embroidered the swallows for the clutches onto silver satin and my friend Belinda from Sybella turned them into beautiful clutches!

Kim and I bought flowers two days before the wedding. We bought them from Northside Flower Market We picked bunches of seasonal that matched our colour scheme and I made the bouquets on Friday night. I had originally wanted to use snap dragons but they are so fragile there is no way they would have lasted and made the trip to Tamborine. We used dusky pink roses, wax flowers, silver suede, and I can't remember the name of the yellow number! I made 5 bouquets and the flowers cost less than $80. Win. We tied the bunches together and wrapped wide lace around the stems. Then I used a ribbon in the colour of the bridesmaid around the centre of the lace so each lady could find her bouquet.


We had a minor crisis with the centrepieces. The ones we selected from the venue became unavailable so Pete and I decided to make our own as the others seemed too tropical. I used my collection of doilies and stitched them together to create the table toppers. We hired some lanterns, I bought some faux aloe vine from a small local business and we cut, moulded and assembled the flowers for the tables.


I used some decorative scrapbooking tags and some sheets of sticky back gems and made the table numbers. We used tiny little silver birds to hold the cards.
We decided to give everybody plants as bonbonierres. We served desert with the meal and we had cupcakes for our guests (we kept the cake to ourselves YUMMO) so we used Rosemary and Lavender (virtue, love, loyalty, fidelity) and I was quite surprised how well people too to them!

I painted a tree on a canvas and we used leaf shaped stamps for our guests to use as a guest book.
We also had printed some postcards which we asked our guests to use to give us their well wishes or advice.


We dressed up some bird cages for our wishing well.

What we couldn't make we had made for us by our crafty friends or other handmade small businesses.
Our rings we bought from jewellers as we couldn't afford bespoke pieces. After looking for nearly 12 months for a second hand vintage band I finally found a replica, very affordable and just down the road at the local shops! Pete found his ring online.
I made the ring dish from air drying clay. You can't see the detail but I used a doily to 'etch' a pattern into it. I will add a tutorial if there is any interest!


All the girls wore a necklace. Our accessory colour was silver so we all had silver swallows with a string of 5 pearls (to represent Love, Patience, Grace, Kindness, Respect). each one was handmade by me.


Peter bought me a bracelet made by a local artisan from The Swich Contemporary Art Space in Ipswich. It is made from some vintage spoons and a pearl. Absolutely gorgeous. I'm fairly sure the spoons themselves are over a hundred years old.
We sourced the swallows used as boutonnières from the UK. They are Victorian replicas made from pewter signed by the maker AR Brown. I also made these into mini fascinators in all the girls hair. Every member of the bridal party had a swallow as did each one of our parents. Very easy for people not familiar with our parents to locate them on sight!

I embroidered the swallows for the clutches onto silver satin and my friend Belinda from Sybella turned them into beautiful clutches!

Kim and I bought flowers two days before the wedding. We bought them from Northside Flower Market We picked bunches of seasonal that matched our colour scheme and I made the bouquets on Friday night. I had originally wanted to use snap dragons but they are so fragile there is no way they would have lasted and made the trip to Tamborine. We used dusky pink roses, wax flowers, silver suede, and I can't remember the name of the yellow number! I made 5 bouquets and the flowers cost less than $80. Win. We tied the bunches together and wrapped wide lace around the stems. Then I used a ribbon in the colour of the bridesmaid around the centre of the lace so each lady could find her bouquet.


We had a minor crisis with the centrepieces. The ones we selected from the venue became unavailable so Pete and I decided to make our own as the others seemed too tropical. I used my collection of doilies and stitched them together to create the table toppers. We hired some lanterns, I bought some faux aloe vine from a small local business and we cut, moulded and assembled the flowers for the tables.


We decided to give everybody plants as bonbonierres. We served desert with the meal and we had cupcakes for our guests (we kept the cake to ourselves YUMMO) so we used Rosemary and Lavender (virtue, love, loyalty, fidelity) and I was quite surprised how well people too to them!

I painted a tree on a canvas and we used leaf shaped stamps for our guests to use as a guest book.
We also had printed some postcards which we asked our guests to use to give us their well wishes or advice.


We dressed up some bird cages for our wishing well.

Friday, September 23, 2011
Turning Kids Art into Mini Quilts!
Pirate Sam and I decided we needed to make something fun and different. Sam has had a unit at Prep based around Pirates so he has been drawing maps like crazy. Pirate Island, Treasure Smeasure, Feather Island and Skull Island to name a few.
I am not the world's best quilter, I don't seem to have that certain amount of patience that is required. But mini quilts, they are my thing!
So Sam and I decided to turn a Treasure map into a mini quilt that he can use and we can wash if it gets dirty. (He gets a bit sad when paper tears)

To start we needed a Treasure Map. Once you have a map you can work out what you need to create it's 3D counterpart.

You'll need:
1 x piece of fabric for your island
1 x piece of fabric for your front
1 x piece of fabric for the back
1 x piece of wadding ( I chose a piece of Thermolan as it will wash well)
1 x embroidery hoop (not really needed but helps keep stitches regular)
needle
embroidery thread
scissors
transfer pen or pencil for fabric (mine is air soluble)
tracing paper if you like
ribbon for tying map scroll together
sewing machine
iron or press
1. Trace your image onto your island fabric

2. Embroider the line work using simple stitches like back stitch or chain stitch. Try not to change any part of the kids work. The imperfections bring the charm!


4. Applique the island to the front piece using a zig zag stitch

5. We'll be stitching our quilting stitches in a grid to represent the longitude and latitude lines of a map. Pin the front piece to the wadding and stitch evenly spaced lines in one direction, either vertical or horizontal.
6. Pin this piece to the backing piece and then stitch the lines in the opposite direction to the lines you just stitched. Completing the grid effect on the front but leaving only one direction of lines on the back.


I am not the world's best quilter, I don't seem to have that certain amount of patience that is required. But mini quilts, they are my thing!
So Sam and I decided to turn a Treasure map into a mini quilt that he can use and we can wash if it gets dirty. (He gets a bit sad when paper tears)

To start we needed a Treasure Map. Once you have a map you can work out what you need to create it's 3D counterpart.

You'll need:
1 x piece of fabric for your island
1 x piece of fabric for your front
1 x piece of fabric for the back
1 x piece of wadding ( I chose a piece of Thermolan as it will wash well)
1 x embroidery hoop (not really needed but helps keep stitches regular)
needle
embroidery thread
scissors
transfer pen or pencil for fabric (mine is air soluble)
tracing paper if you like
ribbon for tying map scroll together
sewing machine
iron or press
1. Trace your image onto your island fabric

2. Embroider the line work using simple stitches like back stitch or chain stitch. Try not to change any part of the kids work. The imperfections bring the charm!


3. Press the island piece using an iron and then cut out the island. Pin it to your front piece.

4. Applique the island to the front piece using a zig zag stitch

5. We'll be stitching our quilting stitches in a grid to represent the longitude and latitude lines of a map. Pin the front piece to the wadding and stitch evenly spaced lines in one direction, either vertical or horizontal.
6. Pin this piece to the backing piece and then stitch the lines in the opposite direction to the lines you just stitched. Completing the grid effect on the front but leaving only one direction of lines on the back.


7. Now use quilt binding around the edge to border the quilt. Whilst binding the quilt attach the ribbon at one side so the map can be tied like a scroll.
ENJOY!

Wednesday, February 16, 2011
Comment to Win with Yvette Stanton! – Sewing Blog | BurdaStyle.com

Taken from the BurdaStyle Blog
"Comment on the blog or on Twitter for your chance to win “The Left-Handed Embroiderer’s Companion” and “The Right-Handed Embroiderer’s Companion,” written by Yvette Stanton!
Book Description: In early 2010, “The Left-Handed Embroiderer’s Companion: a step-by-step stitch dictionary” was released to great acclaim and to the relief of the 10-15% of embroiderers who are left-handed.
With over 170 embroidery stitches demonstrated step-by-step with diagrams and text for each step, left-handed stitchers finally have the stitch dictionary they have been craving. However with its huge popularity, right-handers felt left out, and so “The Right-Handed Embroiderer’s Companion” was published to stop the jealousy!
Yvette Stanton is an Australian embroidery designer, teacher and author. She has written five step-by-step needlework books, and the Left-Handed and Right-Handed Embroiderer’s Companions are her latest two. Yvette is passionate about Whitework embroidery, and loves playing with embroidery stitches. For more information, visit her website, and check out her daily blog, White Threads!
Until Tuesday, February 22nd, you can one of these truly informative books. One right-handed person and one left-handed person will be selected! To enter, answer the following question: What type of embroidery design would you like to create? Also, please mention if you are left-handed or right-handed!
When submitting an answer via Twitter, be sure to include the @BurdaStyle tag and the hashtag #comment2win"
Good Luck!
Comment to Win with Yvette Stanton! – Sewing Blog | BurdaStyle.com
Monday, August 16, 2010
Basic Embroidery Stitches

I love embroidery.
I love vintage embroidered clothes. I love machine embroidered clothes.
When I was pregnant embroidery was my favourite craft. I could sit there with my big belly and watch the idiot box, listen to music, sit inside, sit outside, sit on the bus, sit on the train etc etc.
I embroidered so many things. The baby clothes, a crazy quilt, my clothes, my shoes and my jackets.
It is such a lovely thing to do and the results are always so pleasing.


Now unfortunately it seems embroidery is what I do to mend holes in clothes, so I thought I would revisit my love for it here and share a few basic stitches. As my love is rekindled I'm sure I'll add more!
Look for the links at the bottom to more wonderful embroidery places :)

Click on the pic to make it bigger - then print it for easy reference.
Here's a few embroidery designs for you to try ... let me know if you use them!


http://www.sublimestitching.com with Jenny
http://www.needlenthread.com with Mary
http://needlework.craftgossip.com with Denise
don't wish to make anything but just want to buy some yummy embroidered things
http://www.edwardandlilly.com
http://little-chrissy.blogspot.com
http://michelleclement.typepad.com/blog
http://www.mexicantextiles.com
http://toffeeappledesigns.com
Saturday, April 4, 2009
Re-fashion ... recycle ... renew ... refresh ...
Recipe for refashioned skirt
Take some lace, an old tablecloth, a few old doilies, some dye and a full slip.
Chop, dye, wash, sew, chop, sew.
Take some lace, an old tablecloth, a few old doilies, some dye and a full slip.
Chop, dye, wash, sew, chop, sew.


Wednesday, March 25, 2009
My hands are itchin' to be stitchin' ...
I have once more been bitten by the embroidery bug.
It happens
I seem to change my craft focus as often as the weather and seasons.
One moment all I can do is hairclips, next all I want to do is sew, next it's all about embroidery!
So here we are, me, my hoop, some thread and the idiot box.
It happens
I seem to change my craft focus as often as the weather and seasons.
One moment all I can do is hairclips, next all I want to do is sew, next it's all about embroidery!
So here we are, me, my hoop, some thread and the idiot box.


Tuesday, February 3, 2009
Bibs and Bobs from all over the place ...
Today I had a day without children. With Er-Bear at school and the little man at daycare, it meant I had an entire free day to either carve it up on the sewing machine or do a spot of shopping child free.
Hmmm ... how long did it take you to work out what I did?
First stop was the Department of Transport to renew my license. I wanted a new pic because the last one was taken just after I had Sam and I was a bit post preggo puffy. (Vanity ... oh dear)
Around the corner from the DT is a favourite Thrift Shop and it's only recently opened up again after the christmas break so I ducked in there and found these little pretty bargains

1. & 2. Japanese made Tea cup set of 4 (so pretty)
3. Squirrels
4. Vintage Linen
5. Hand Painted Folk Art Tray
6. Tablecloth with print of England and National Icons
7. Vintage Grooming set - brush and mirror
8. Vintage Hand Painted Voile
I am going to turn the tablecloth into a flip skirt I think
I stopped at a cafe next and had a pot of tea (and read a tattoo mag - for inspiration) and visited the Post Office where I sent off my first ever Etsy sale item. I usually get sales from eBay but I love Etsy so much more and it's so much more affordable!
After the PO I dropped in to Funky Fabrix to have a sticky beak. Of course I couldn't help myself and here are my new lovelies ...
3. Squirrels
4. Vintage Linen
5. Hand Painted Folk Art Tray
6. Tablecloth with print of England and National Icons
7. Vintage Grooming set - brush and mirror
8. Vintage Hand Painted Voile
I am going to turn the tablecloth into a flip skirt I think
I stopped at a cafe next and had a pot of tea (and read a tattoo mag - for inspiration) and visited the Post Office where I sent off my first ever Etsy sale item. I usually get sales from eBay but I love Etsy so much more and it's so much more affordable!
After the PO I dropped in to Funky Fabrix to have a sticky beak. Of course I couldn't help myself and here are my new lovelies ...

1. Owl Panel from Saffron Craig (blog is here)
2. Sublime Stitching Rock and Roll Embroidery Patterns (blog here)
3. Vintage Fabric pocket Mirror
4. Funky Fabrix Owl Badge/Pin/Button (Funky Fabrix Online here - Funky Blog here)
One last stop before returning home and that was to The Quilters Corner where I purchased this little beauty to make up a derby skirt.
2. Sublime Stitching Rock and Roll Embroidery Patterns (blog here)
3. Vintage Fabric pocket Mirror
4. Funky Fabrix Owl Badge/Pin/Button (Funky Fabrix Online here - Funky Blog here)
One last stop before returning home and that was to The Quilters Corner where I purchased this little beauty to make up a derby skirt.

1. Cowboy Fabric from The Quilters Corner
I had so much trouble stopping myself from buying anymore fabric from either of these perfectly gorgeous places ... the fabrics were so lovely and all I could see were things I could turn them into but will power won out!
I had so much trouble stopping myself from buying anymore fabric from either of these perfectly gorgeous places ... the fabrics were so lovely and all I could see were things I could turn them into but will power won out!
Subscribe to:
Posts (Atom)